Imagery for Fashion Virtual Try-On
Scope
Virtual try-on is an optional feature currently available for Women's Clothing only, excluding the following:
Maternity wear | Any products with thumb holes |
Shapewear | White lace |
Lingerie | See-through/netted or mesh materials |
Undergarments | Accessories |
Hosiery and socks |
What Is Virtual Try-On?
When customers shop for Fashion items on Walmart.com or the mobile app, we want to make it easier for them to find clothes they'll love. Virtual try-on uses technology powered by Augmented Reality Apparel (AR Apparel) to allow customers to see what styles will look like on them. This can help increase the add-to-cart rate, lift the average order value, and reduce returns. Learn more about the customer experience for virtual try-on here.
Below is an example of a Walmart.com Product Detail Page with the virtual try-on feature:
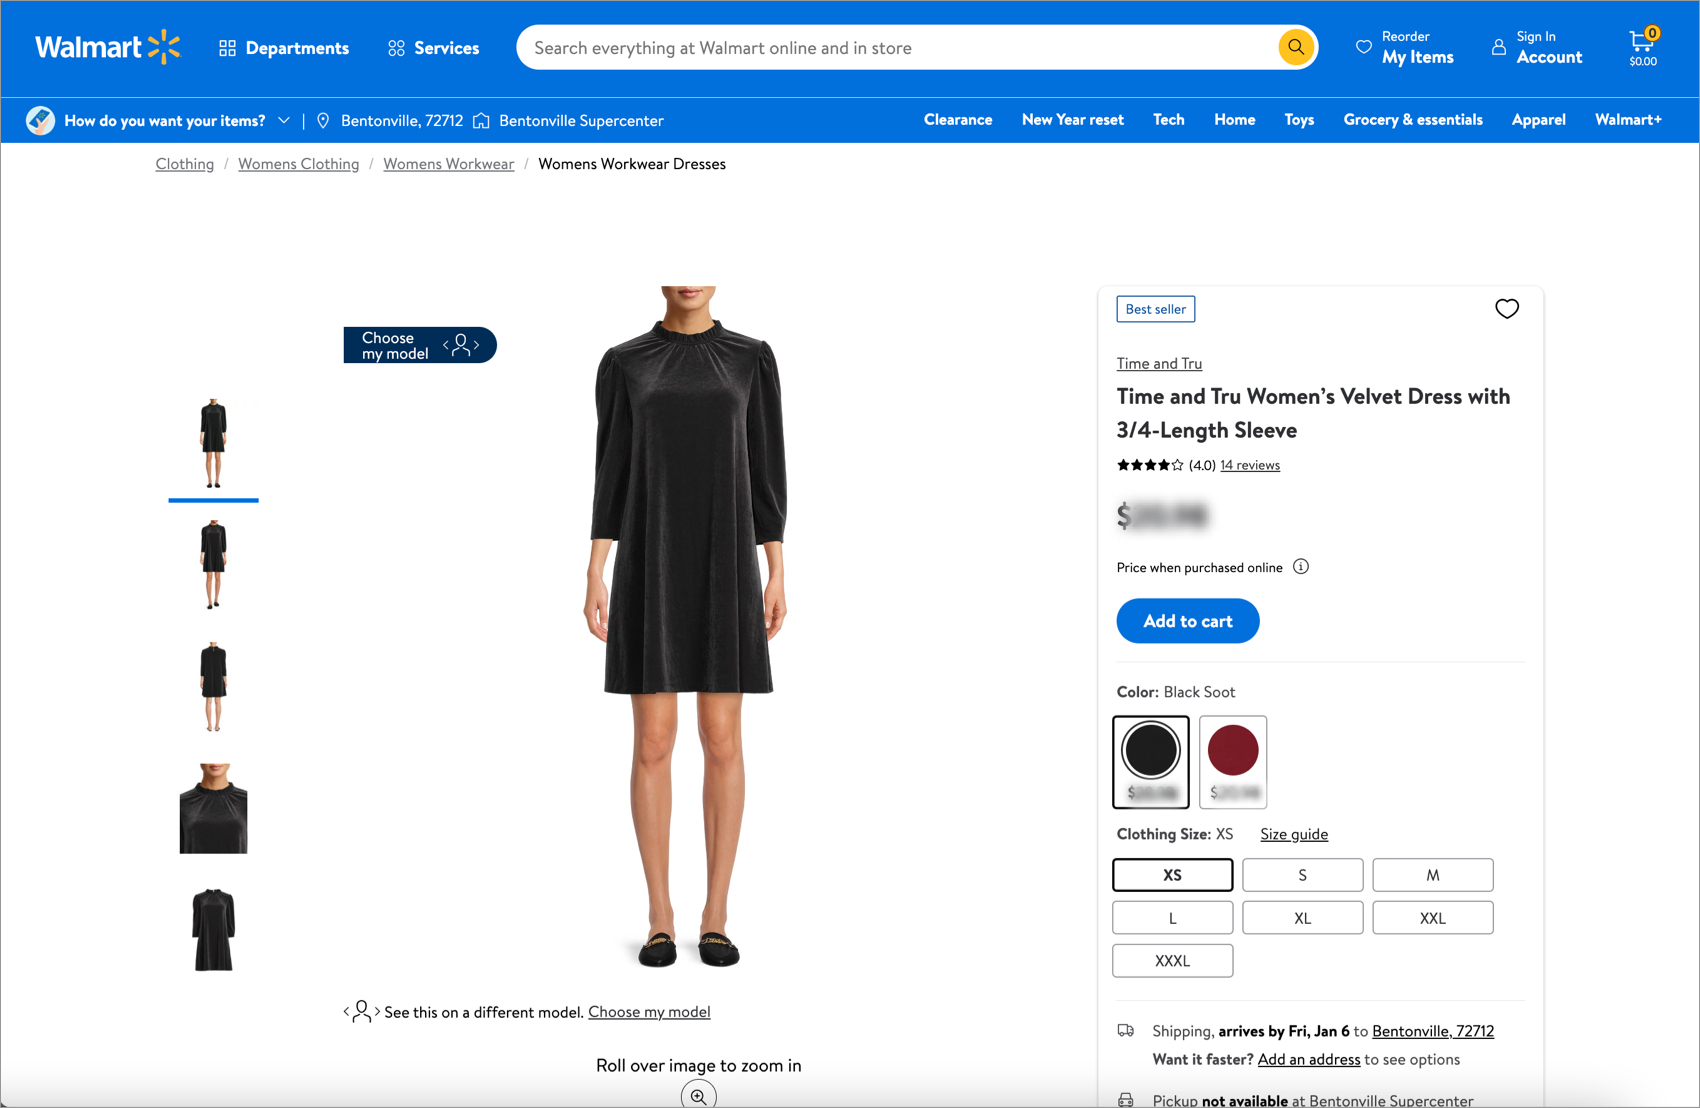
Currently, virtual try-on supports Women’s only for the following clothing items:
Tops | Skirts |
Bottoms | Rompers/jumpsuits |
Jackets/coats | Swimwear/beachwear |
Dresses |
Common Terminology
Below are terms that you should become familiar with:
Flat imagery
There are four different types of "flat" garment images: Flat Lay, Falling Flat, Flat Sleeves, and Unrealistic Flat. The virtual try-on technology is unable to process flat imagery, so you should not submit imagery that looks like the four examples below.

Ghost image
A ghost image is a garment without the model or mannequin.

Body volume
Body volume indicates the garment has a mannequin or model (or the figure of a model/mannequin) within the garment.
Zeekit
Zeekit is the name of the technology. Walmart also refers to this technology as Augmented Reality Apparel (AR Apparel).
Imagery Requirements for Virtual Try-On
To enable the virtual try-on feature, there are image requirements to ensure compatibility with the AR Apparel system. For best results, clothing items should be photographed in proper studio lighting with these 3 key requirements:

AR Image File Requirements |
|
Dos and Don'ts
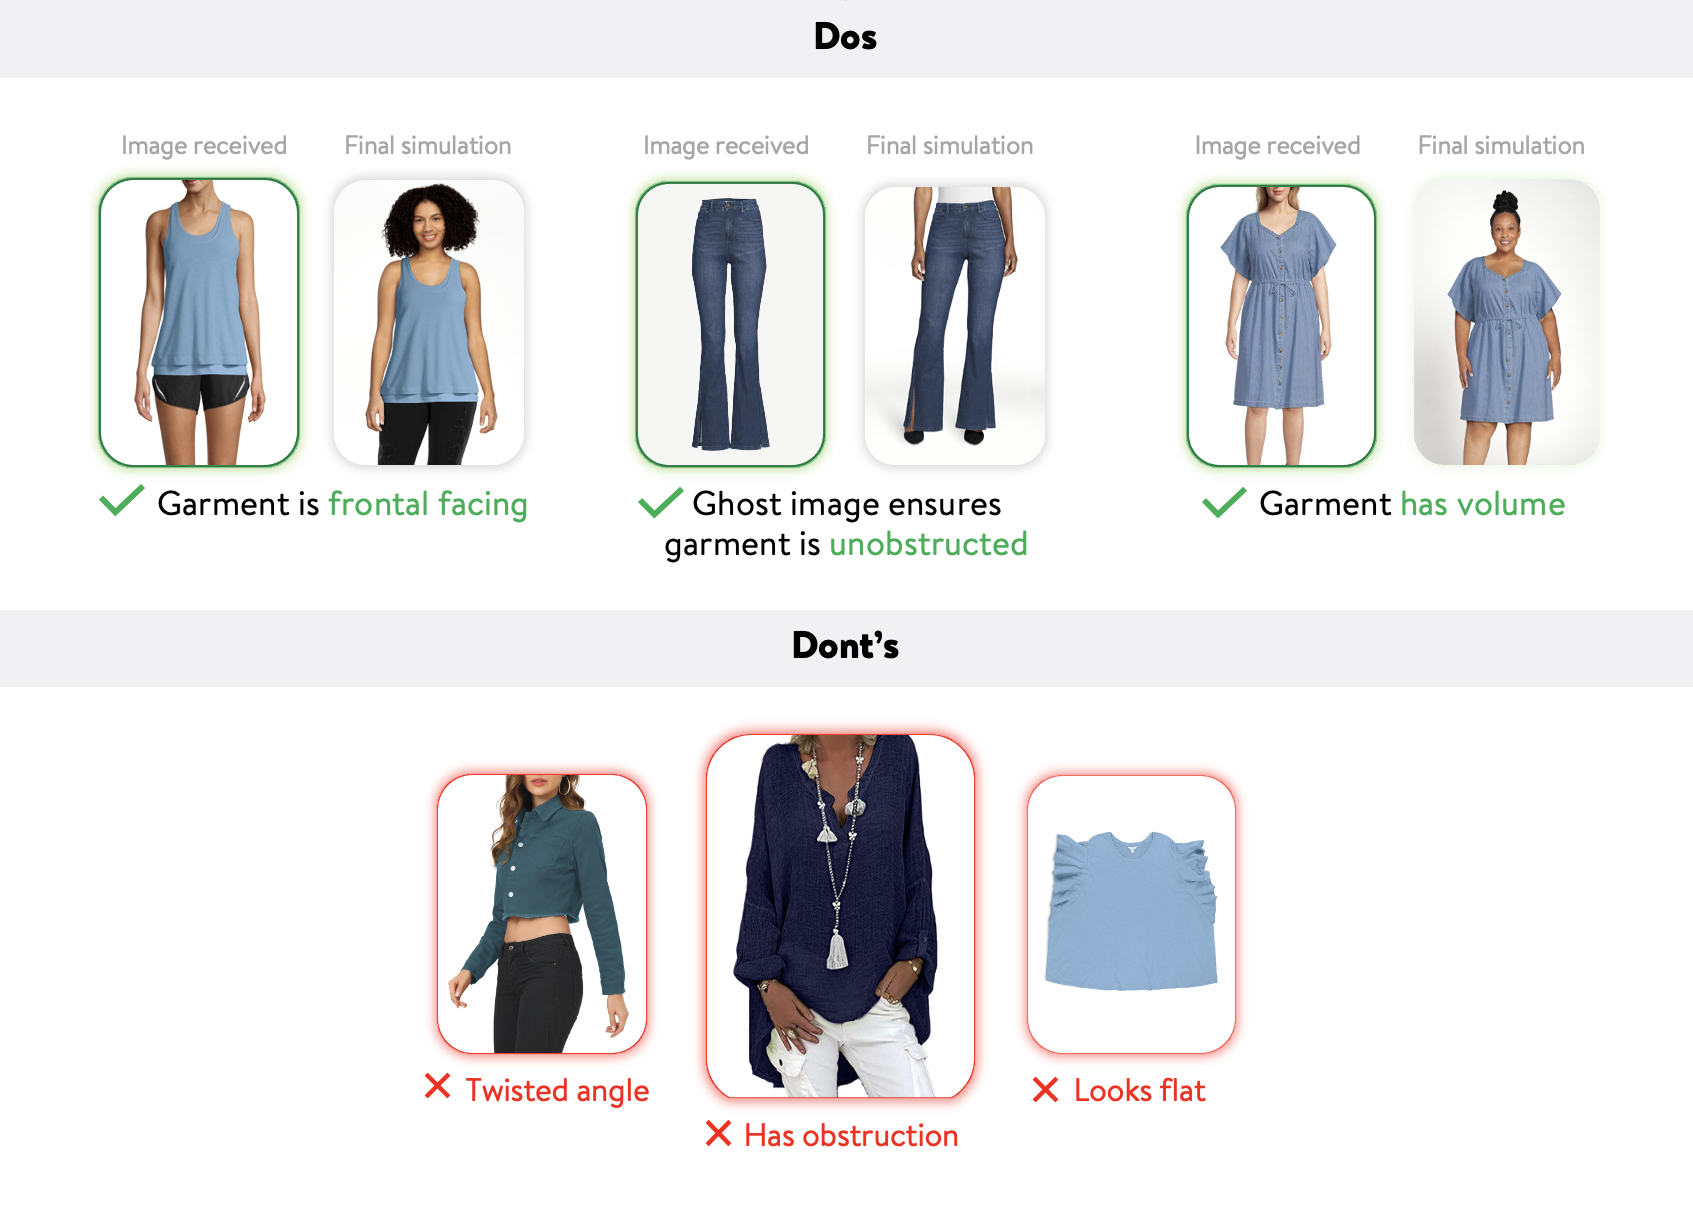
Model, Mannequin, or Ghost Image?
 | For the most natural looking simulations, it is highly recommended to use a model. There are no requirements when choosing a model, only that the clothing fit well. |
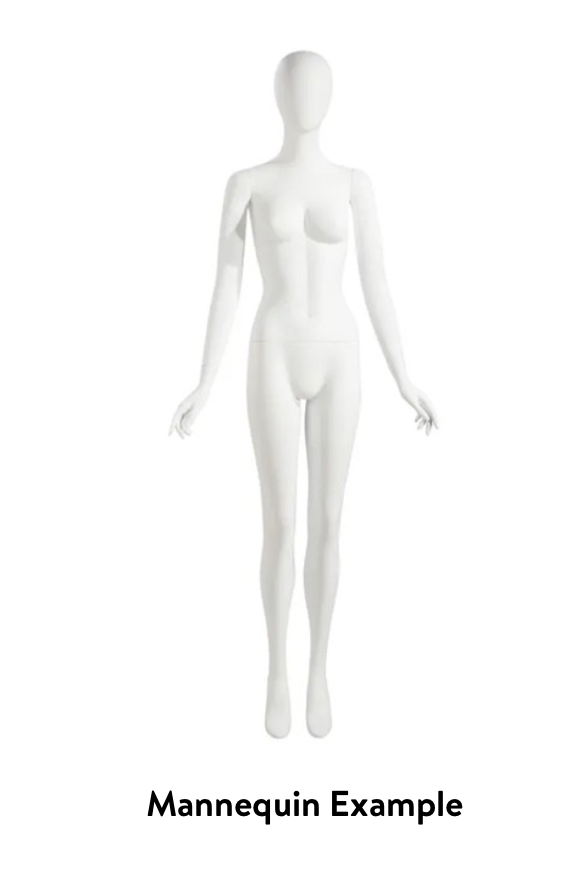 | Mannequins are also suitable so long as they meet the following requirements:
If you are photographing plus-size products, be sure to have a plus-size mannequin. Do not put plus-size clothing on a regular mannequin as this will affect the final simulations. |
 | A ghost image is the product without a model or mannequin.
|
Photography Setup
Mannequin/Model
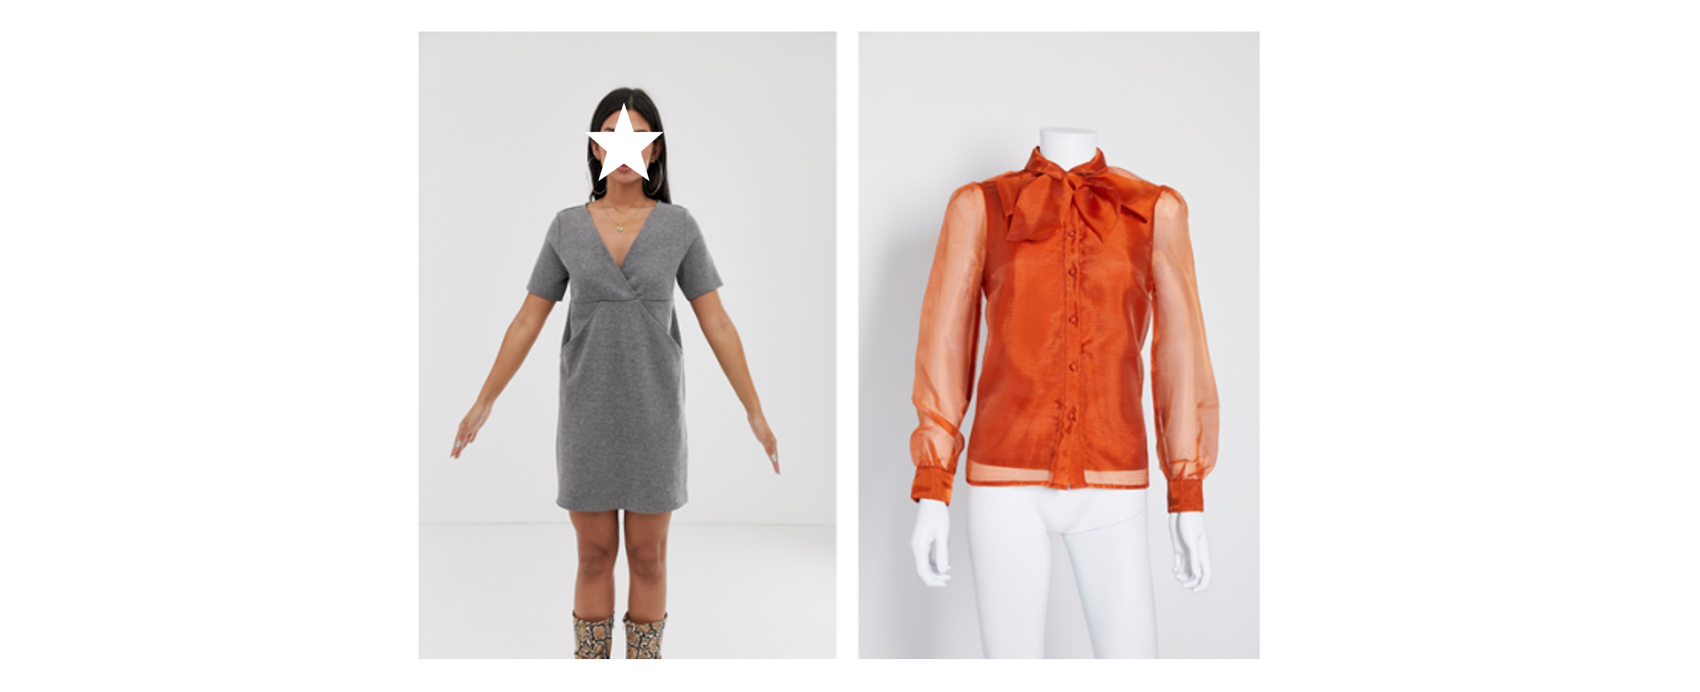
- Front capture: Position the model or mannequin directly in front of the camera, facing forward to photograph the front of the product. The shoulders and knees must also face the camera.
- Back capture: Position the model or mannequin to directly face the backdrop. Ensure hair is not directly on the back, but off to the side of the shoulders. There should be no rotation in the body's frame.
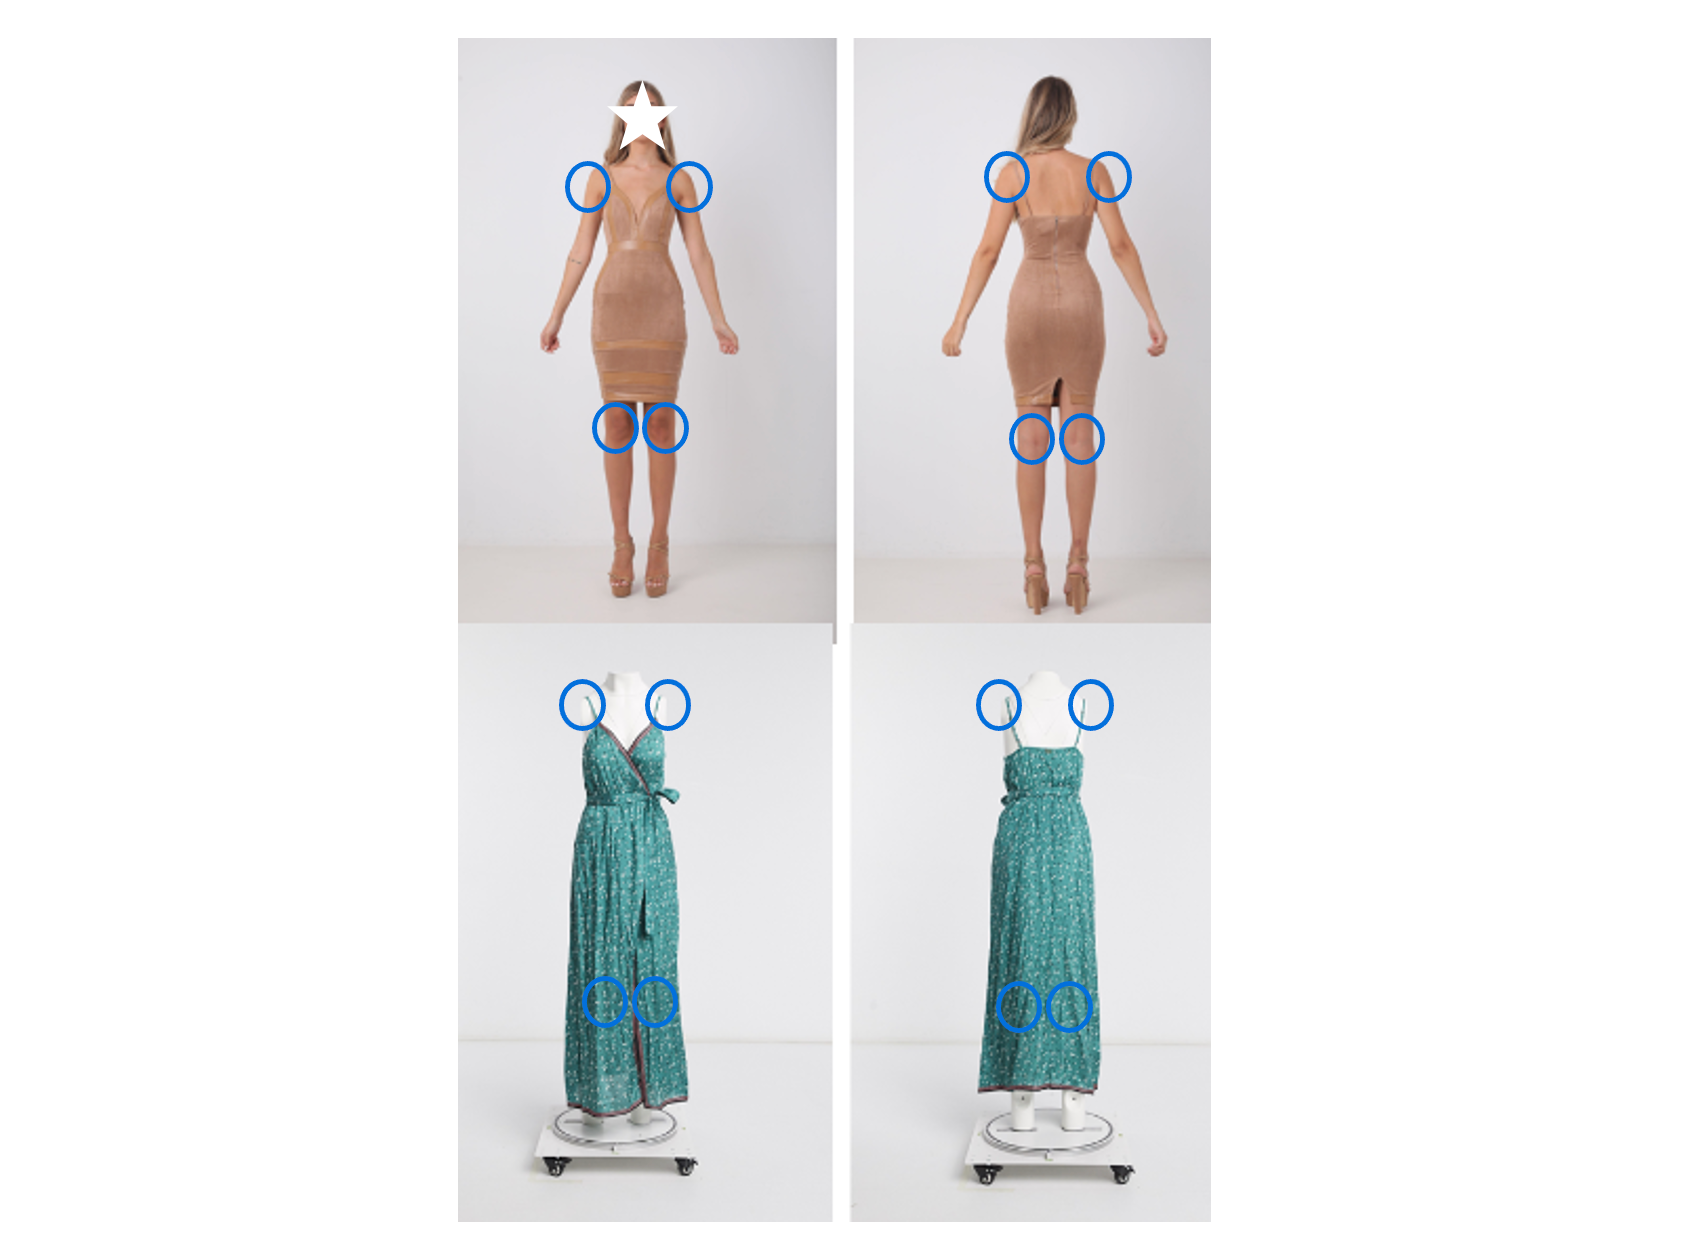
Model
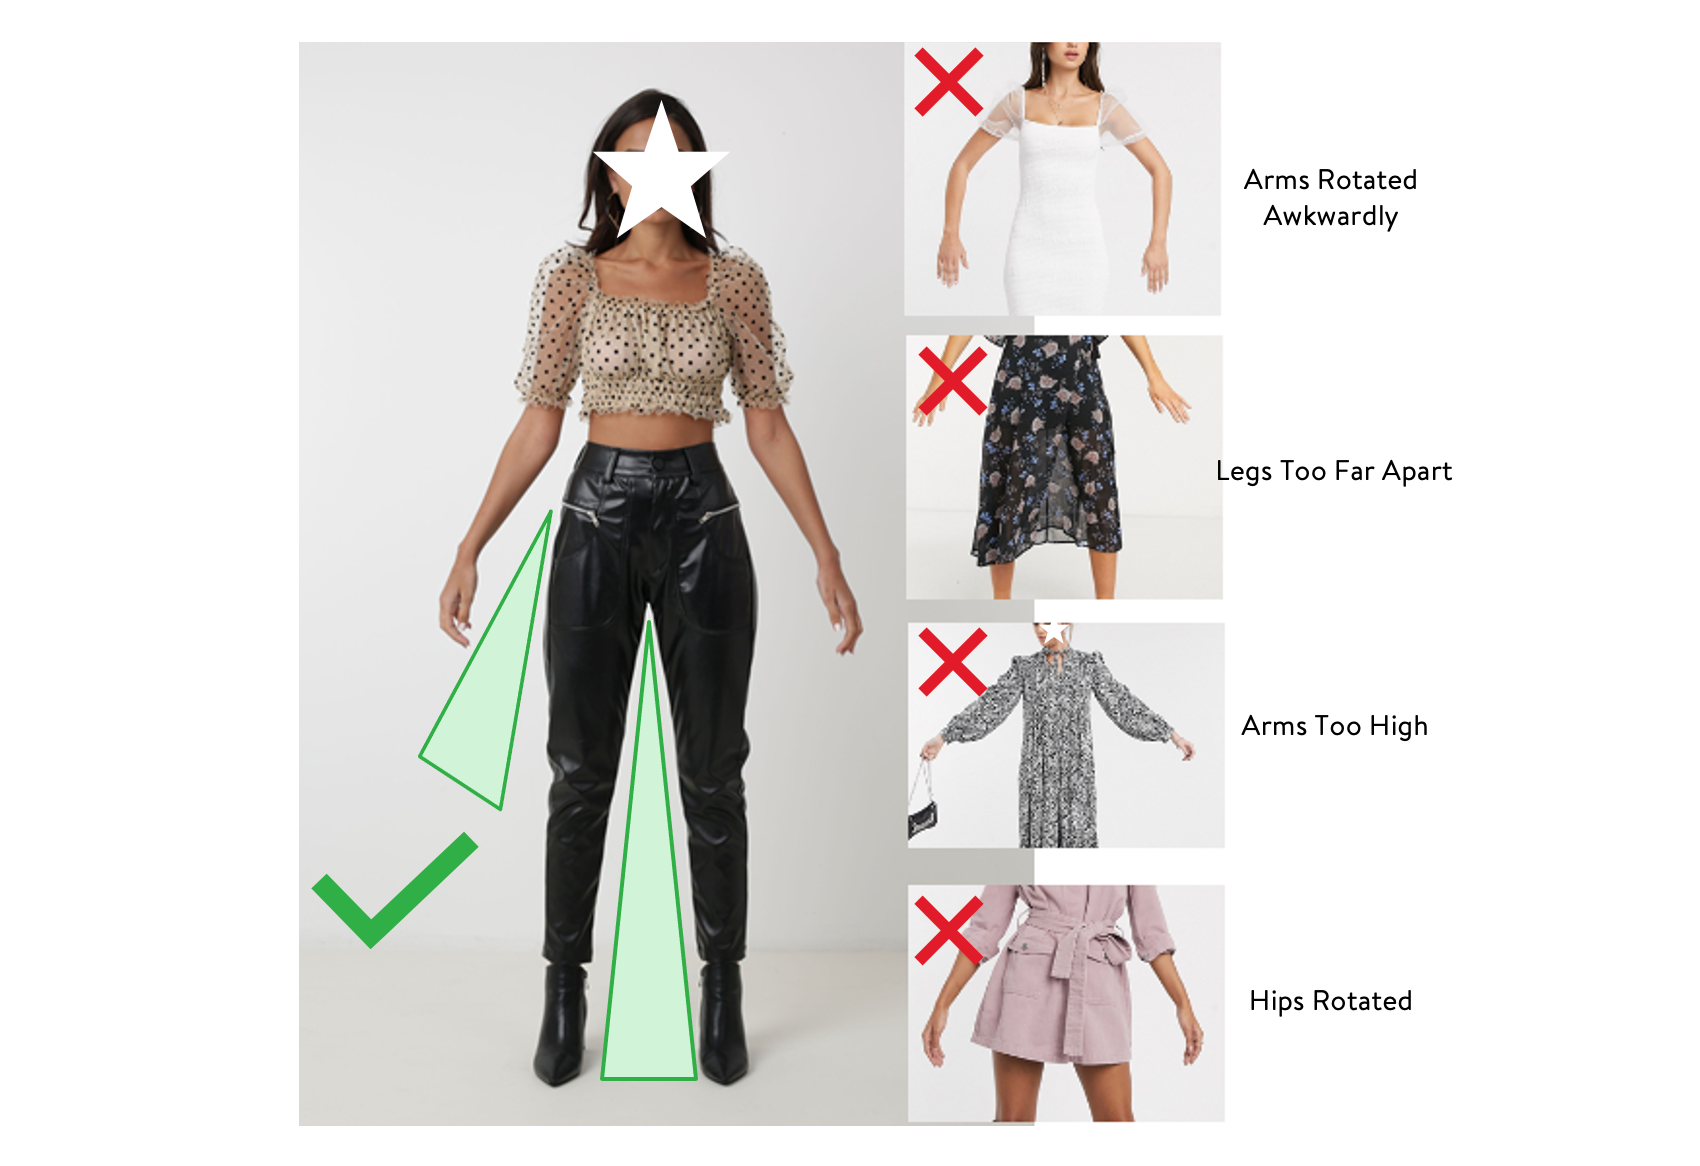
- Plant feet firmly on the ground, hips width apart.
- Hold arms up at a 25° angle away from the body.
- Do not change the natural fall of the clothes when placing the legs or arms apart.
Mannequin
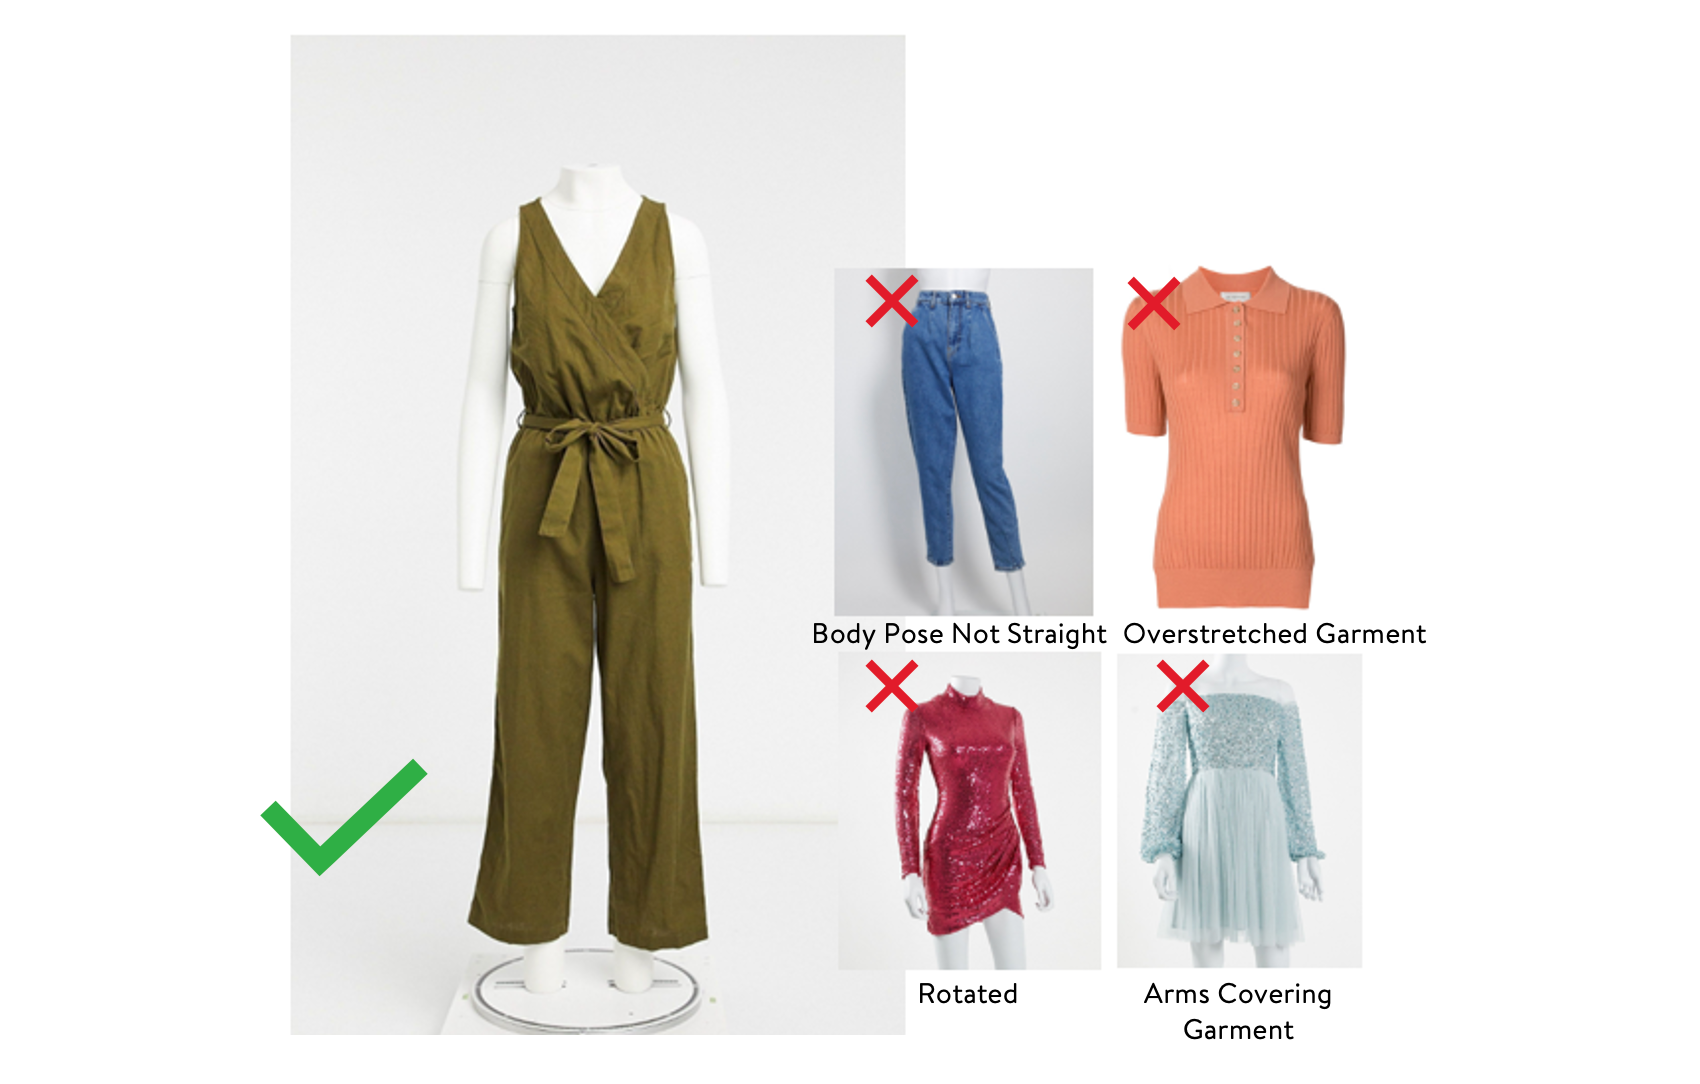
- Make sure the garment looks good without being too stretched or droopy.
- Ensure you can fully see the garment.
Lighting
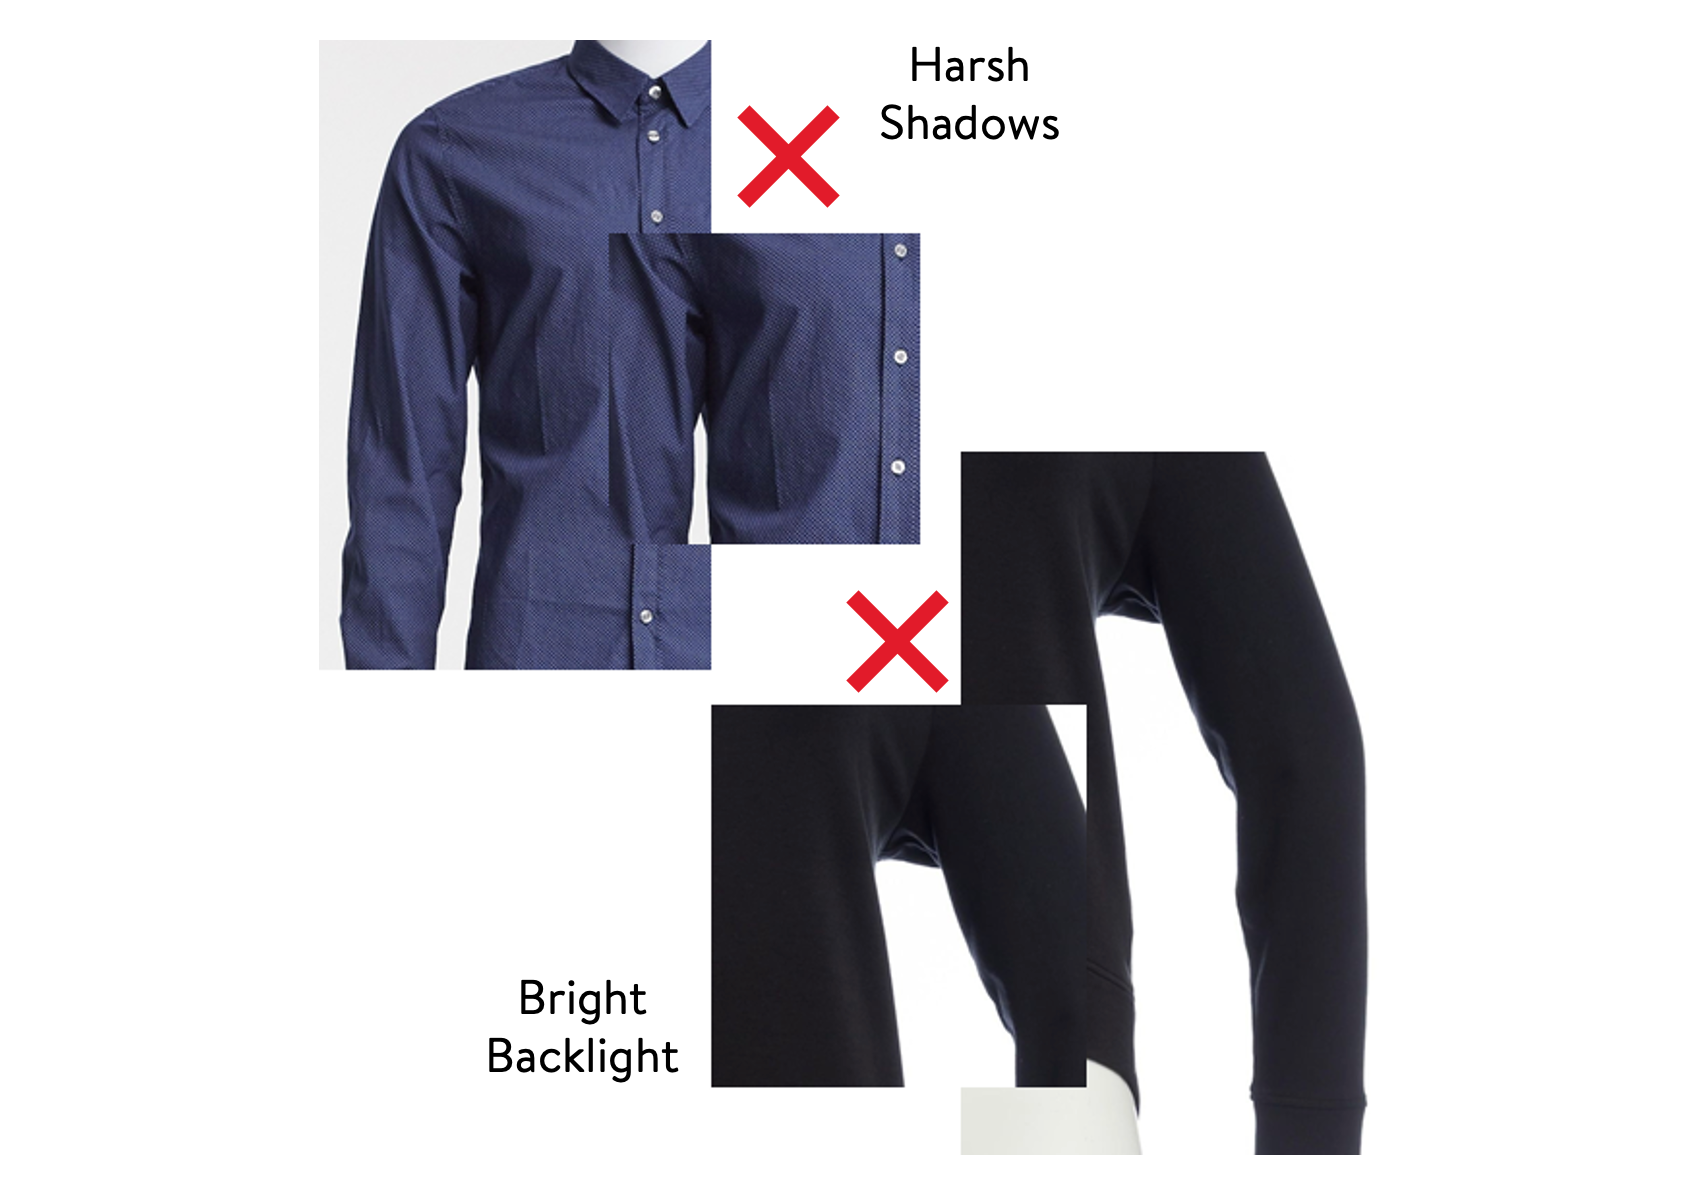
- Set up your studio lighting properly, making sure there are no harsh shadows or bright backlighting on the products.
- Take high-quality JPG images.
Color
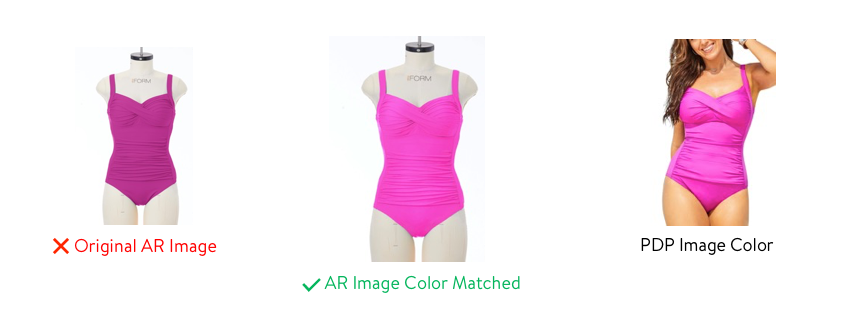
Make sure that the AR image will match the image on your Product Detail Page in terms of color (Walmart does not do any editing for color correction).
Crop
Do not photograph the products from far away and crop the image. Move the camera closer to the product instead.
How to Take Photos
Tops
Make sure the camera can see the entire garment and no part is obstructed in any way. Be sure to untuck the shirt from the bottoms.
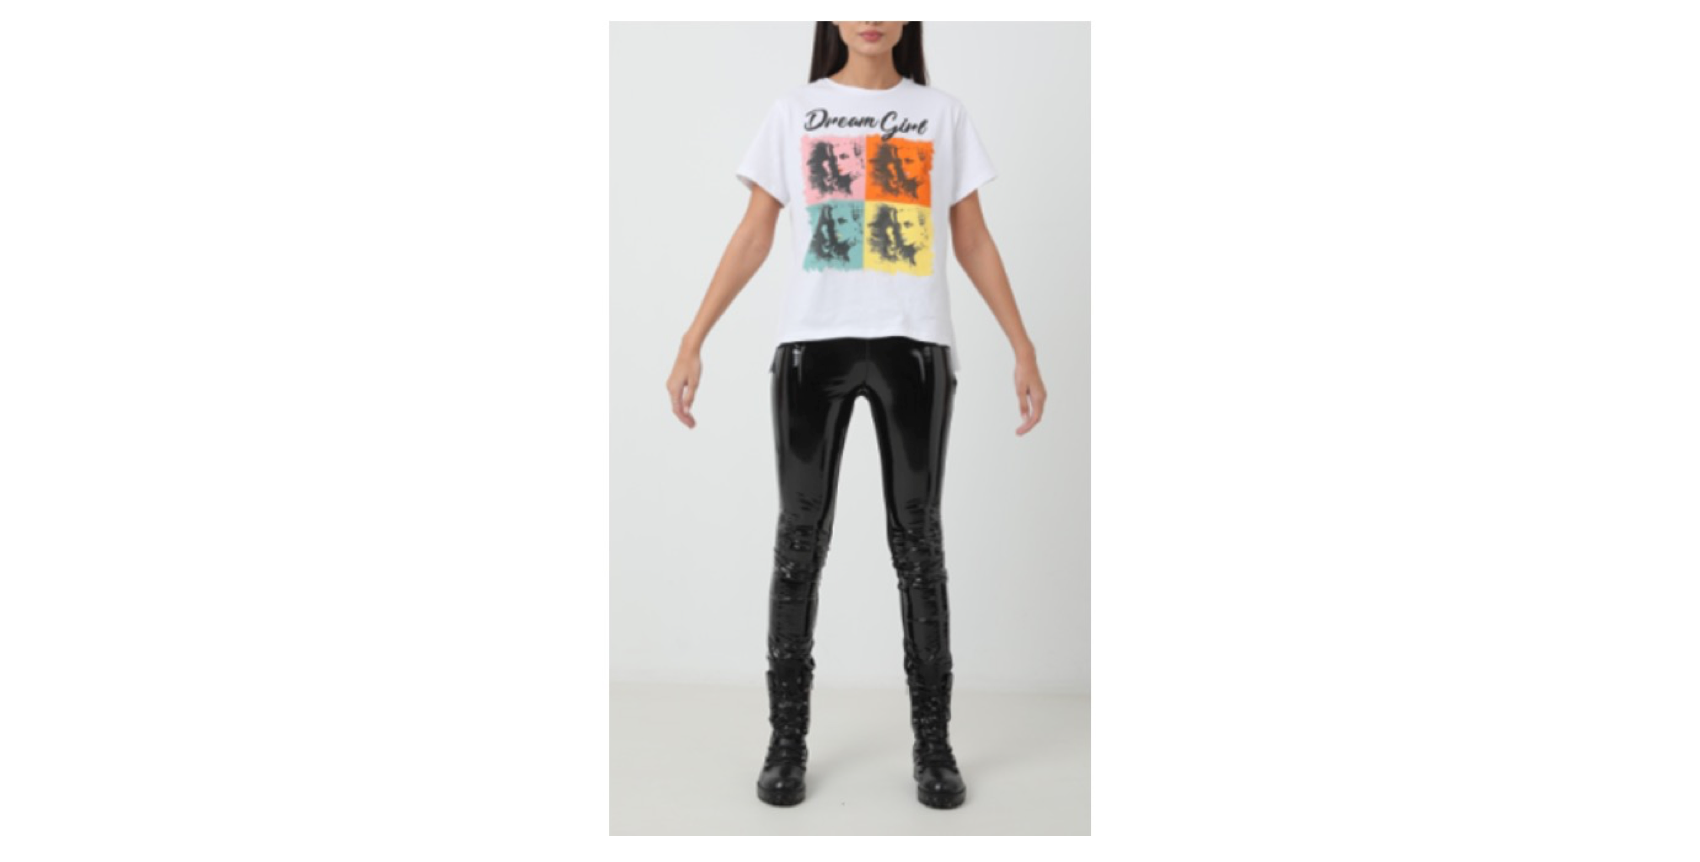
Bottoms (pants, skirts, etc.)
Make sure the camera can see the entire garment and no part is obstructed in any way. Be sure to hold or clip the top up and away from the bottoms.
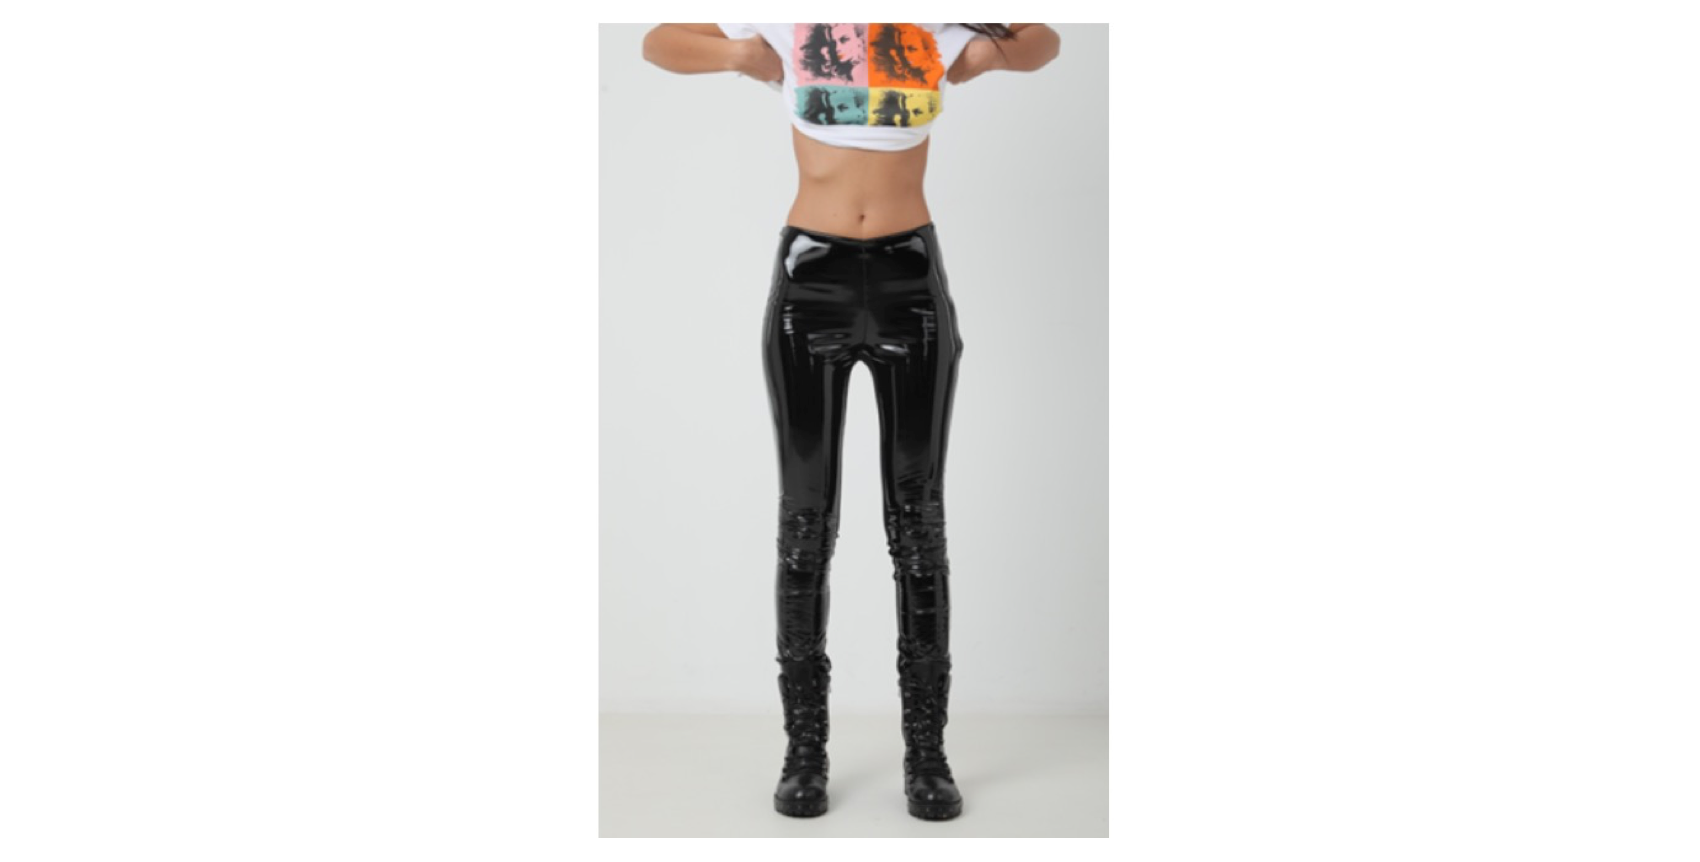
Dresses, Rompers, Jumpsuits
Make sure the camera can see the entire garment and no part is obstructed in any way.

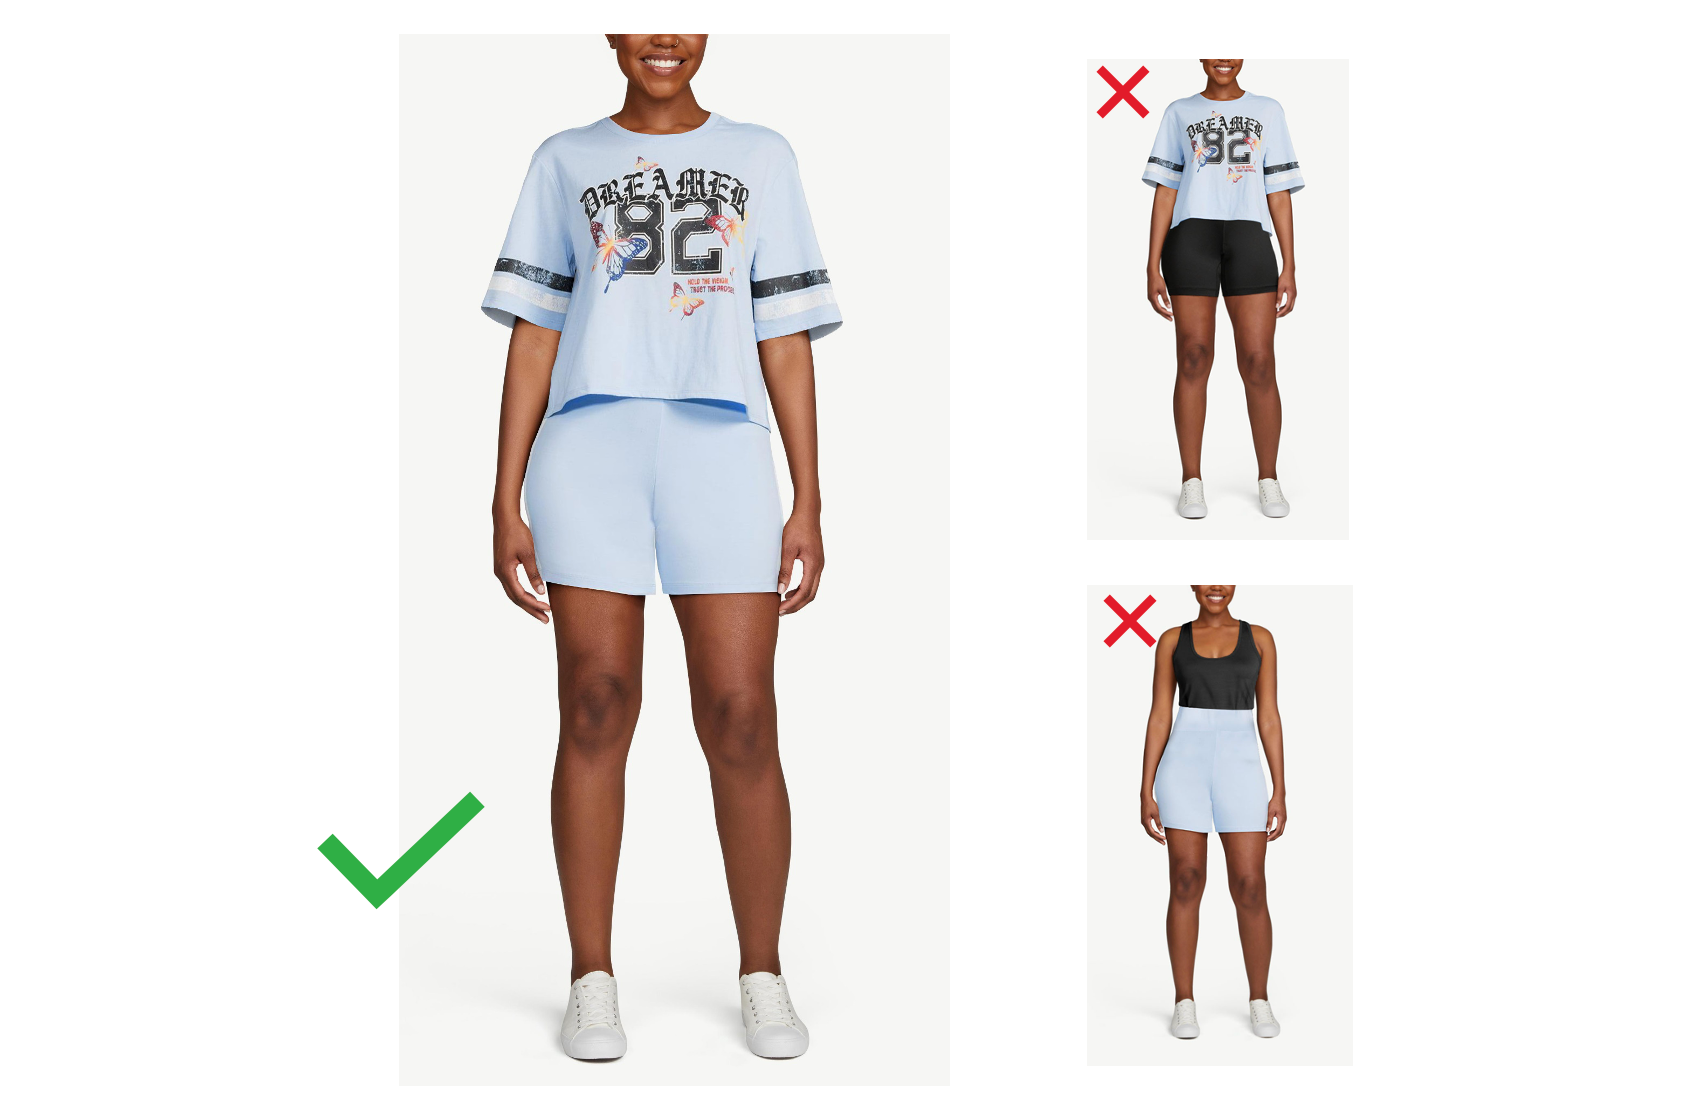
Two-piece Sets
For sets that have two pieces sold together, the products must be photographed vertically in the same ONE image with the appropriate gap between the top and bottom or overlapping (depending on how it will be worn when styled together).
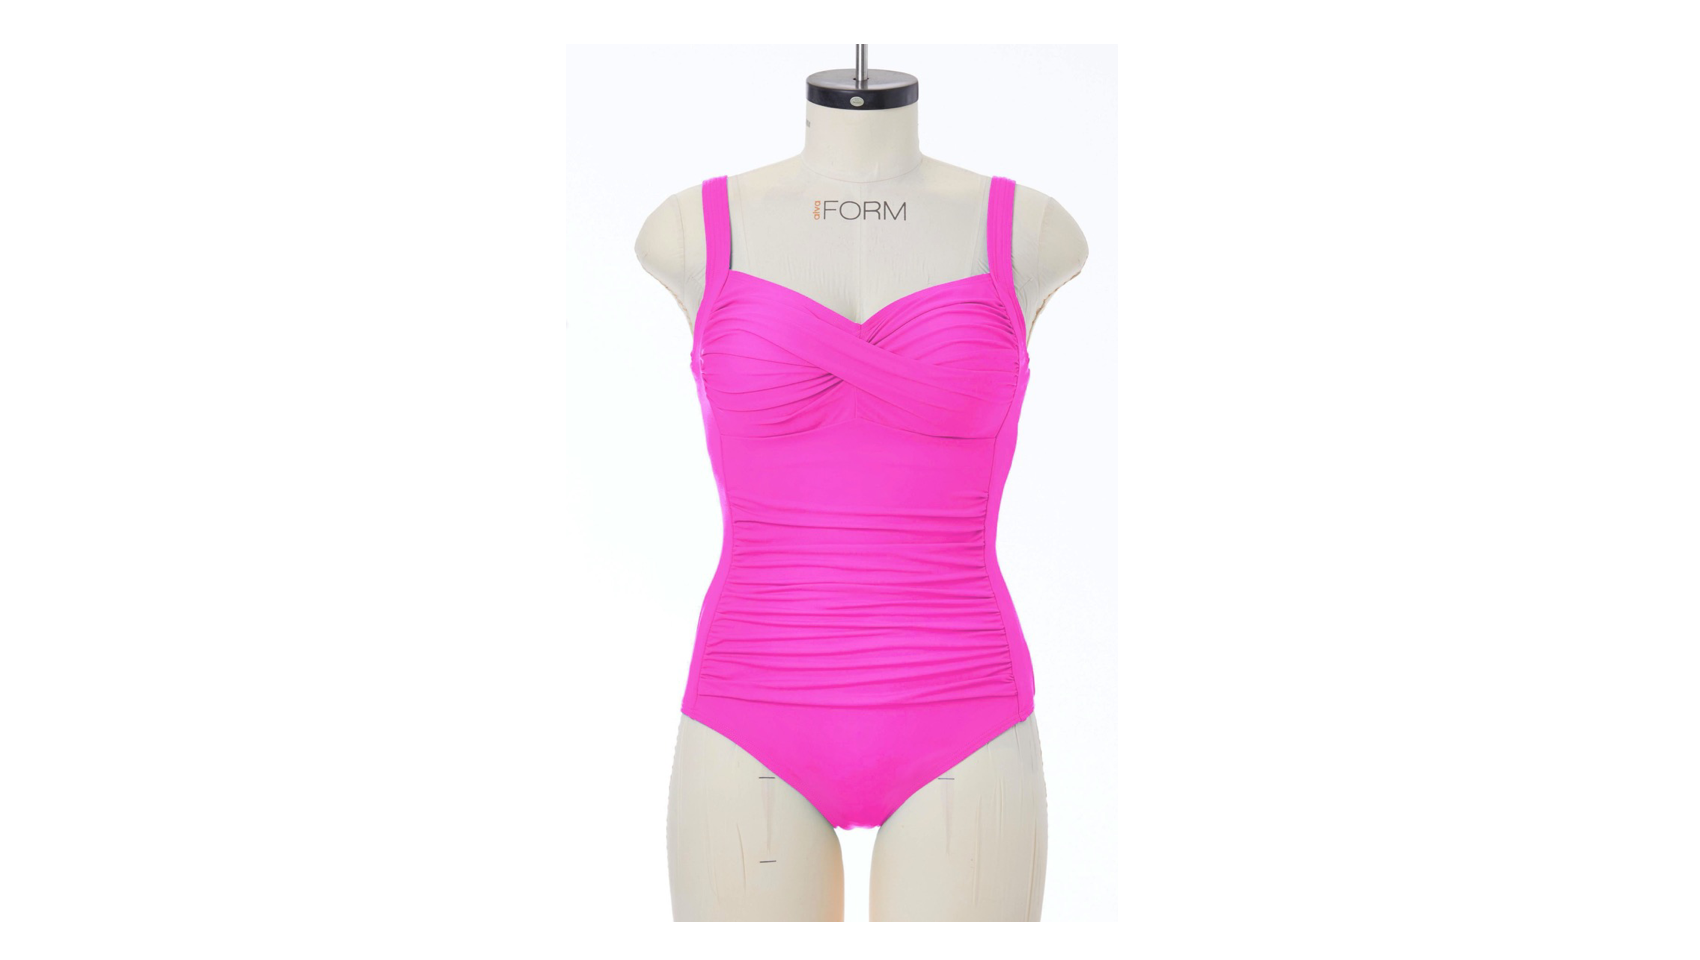
Swimsuits
The swimsuit needs to be smoothed out and sit as flattering as possible on the model/mannequin. Be sure to smooth and straighten the crotch area especially.
What to Avoid
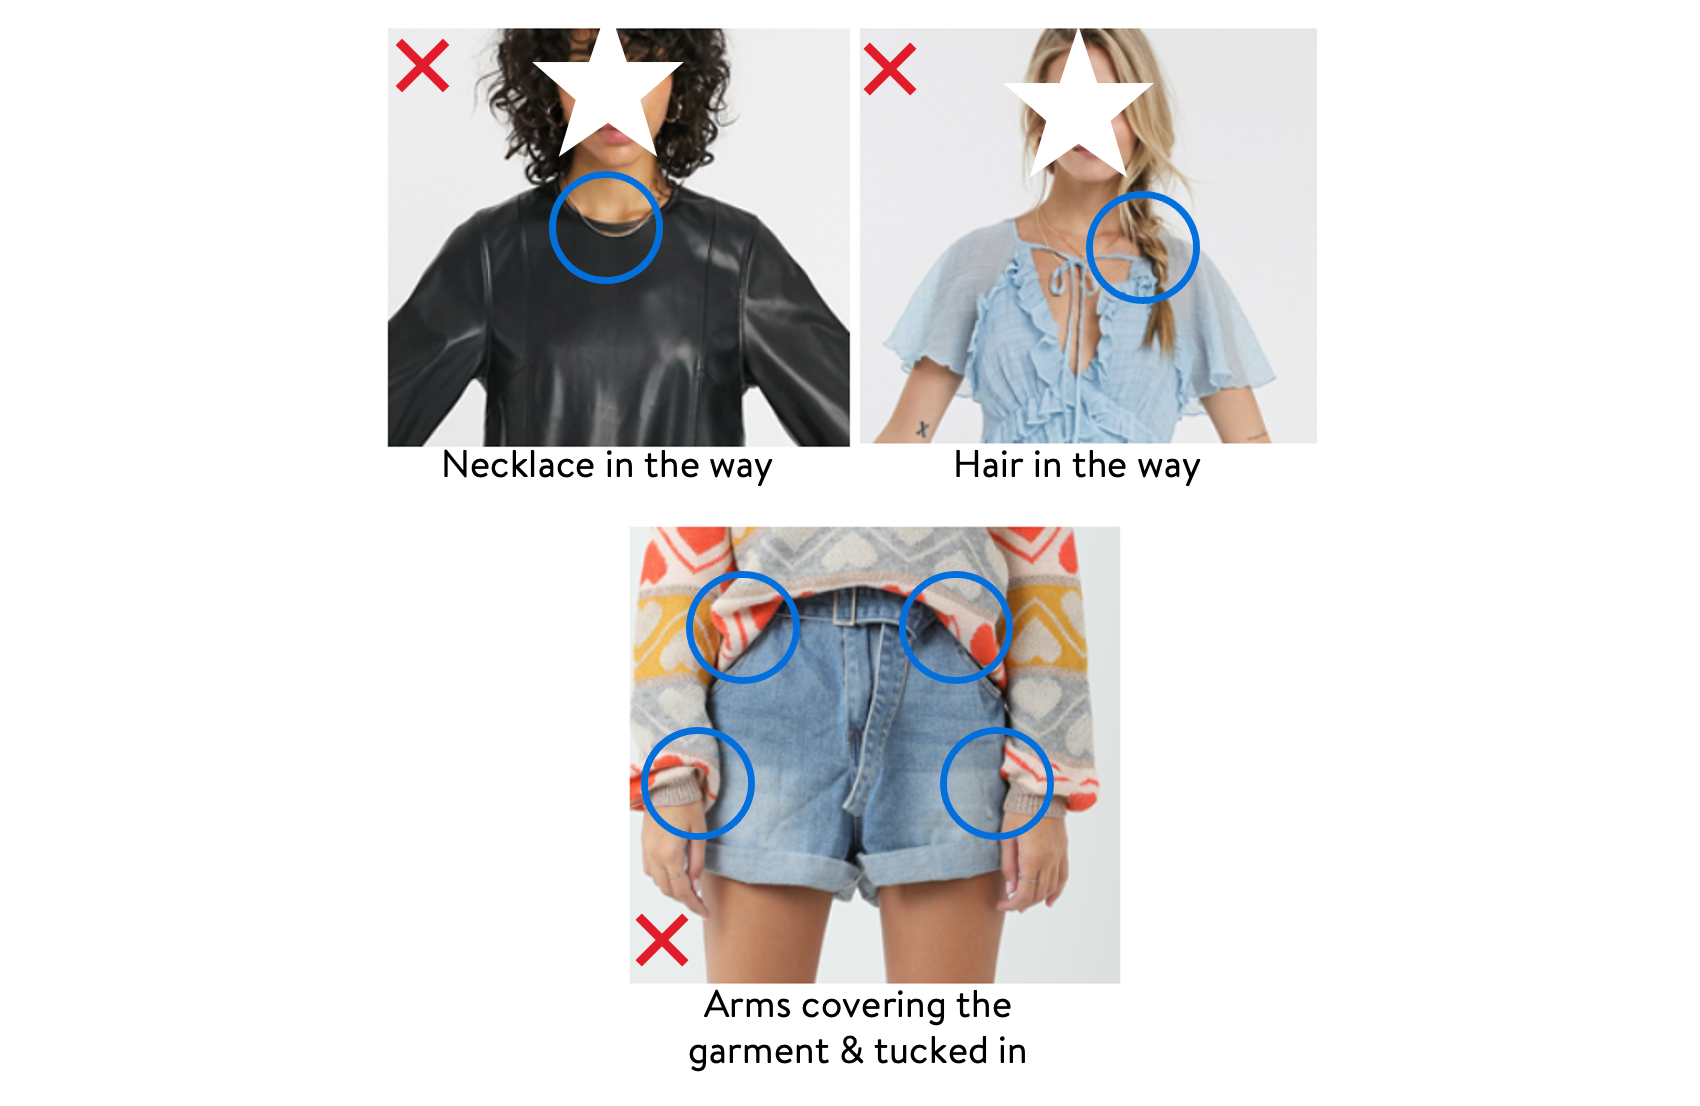
Obstructions
Make sure there is nothing obstructing any part of the garment. For example:
- Remove accessories.
- Tie/move hair back.
- Ensure no other body parts block the garment.
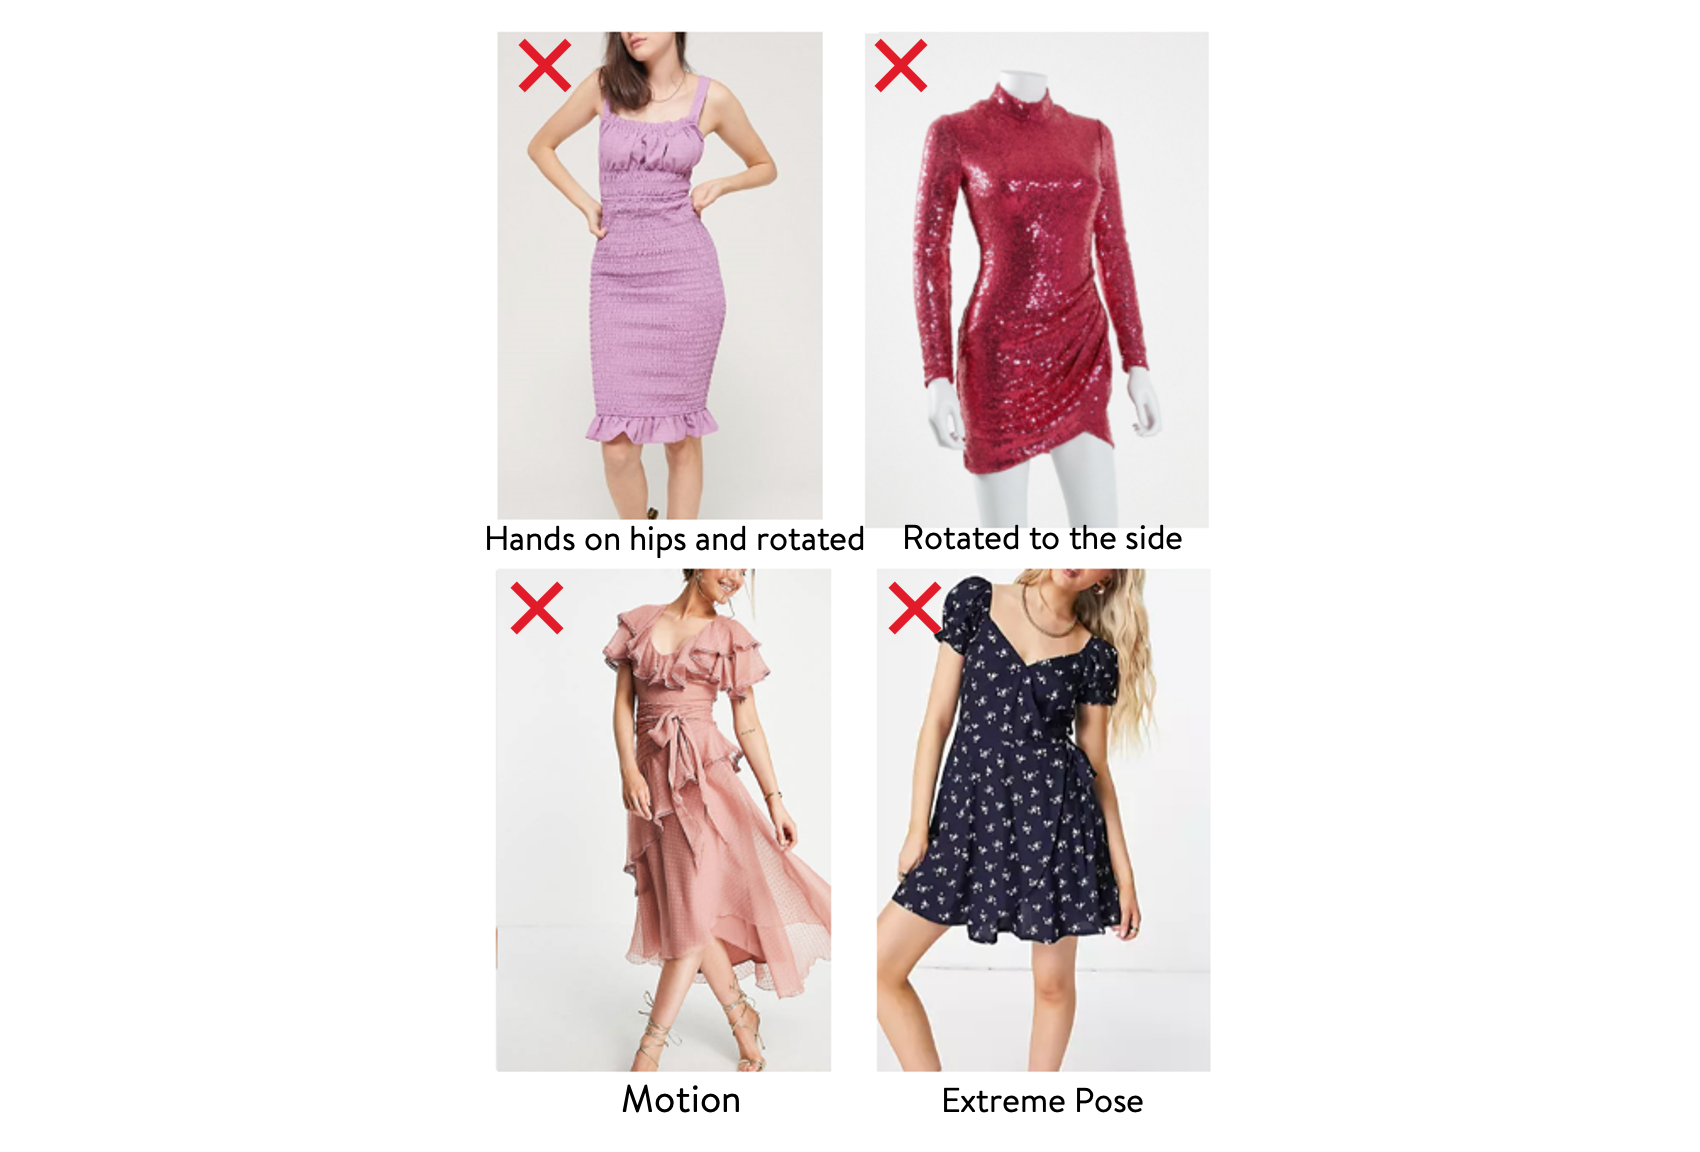
Tilting, Rotation, and Extreme Poses
Make sure the model or mannequin is facing forward and straight towards the camera with no rotation, motion, or unique poses of any kind.
Styling
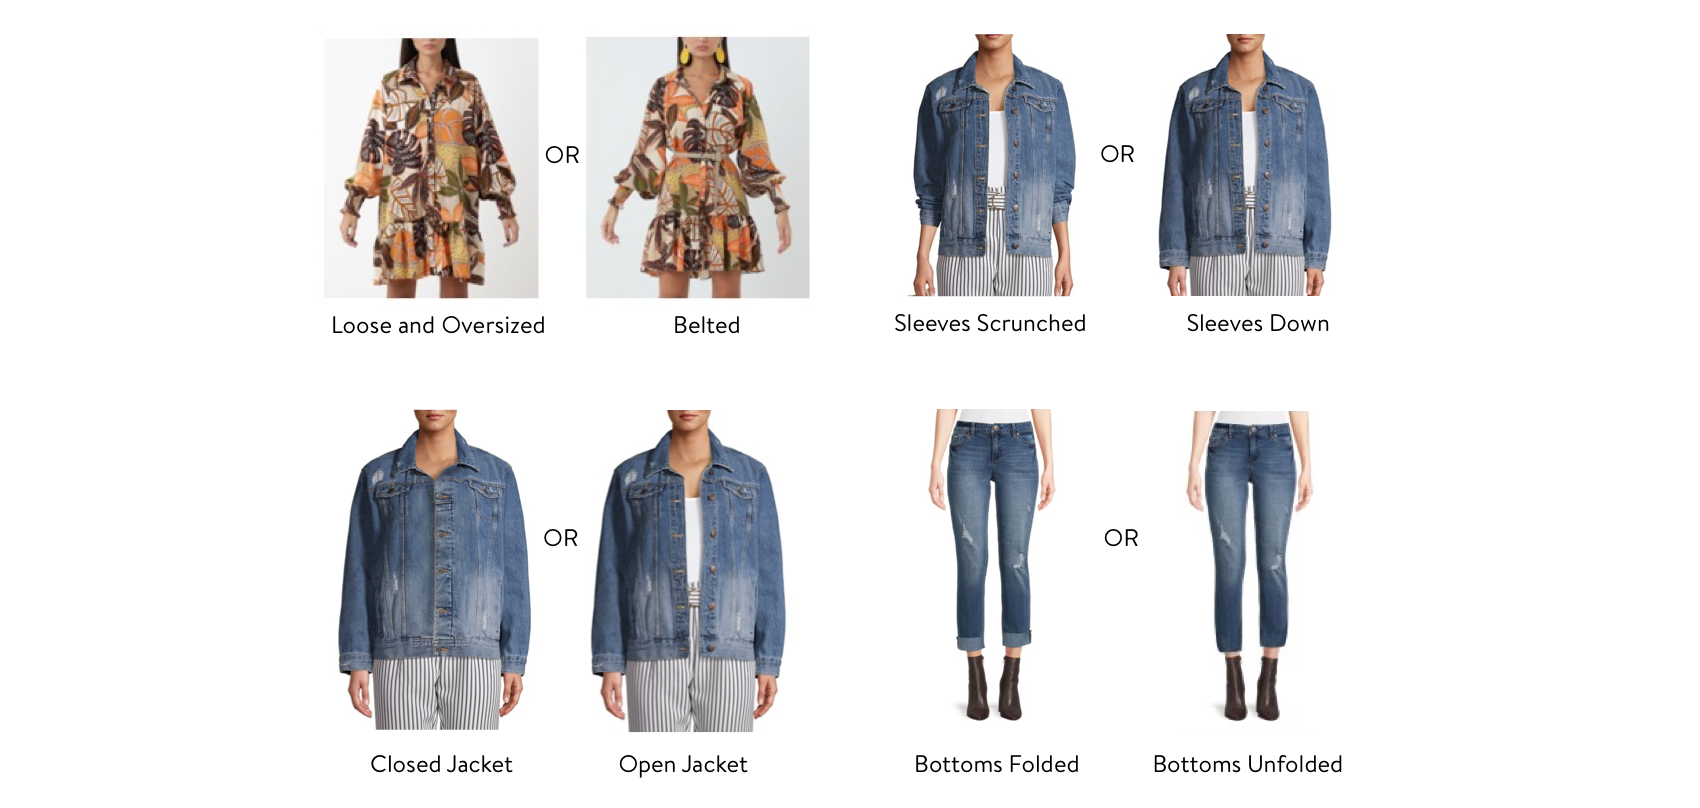
What You See Is What You Get
Only one photo per product is uploaded to the AR Apparel system, and the way the product looks in the photo is how it will look in the model simulations.
Make sure to style the product the way that you want it to look in the model simulations (e.g., dress loose/belted, jacket open/closed, sleeves scrunched/down, hems of pants folded/unfolded).
Uploading an AR Image
The image upload guidelines remain the same for the AR image for virtual try-on, and it must comply with image standards. The file naming standard still requires you to use the GTIN in the file name. For questions on the current standards, go to the New Apparel Sample and Imagery Process Course on Supplier Academy and click on Walmart Fashion Content Standards under the Resources and Attachments section.
Imagery File Names
Please use the following naming convention for the AR image:
GTIN_SWAV99
For example: 00112233445566_SWAV99.jpg
New Product Uploads
Require you to add the additional image to the image upload workflow.
- If you currently use Workhorse for imagery, please continue to use that process (i.e., do not submit the AR image in Item 360).
Existing Products
Require suppliers to “edit” your content and add the additional image in Workhorse (i.e., do not submit the AR image in Item 360). For existing 3P items, sellers should upload the AR image in Seller Center.
Virtual Try-On on the Product Detail Page
An item must have a live Walmart.com Product Detail Page (PDP) before AR Apparel can download the AR image submitted. Once the image has been downloaded, it takes about one week to process the image and ensure it meets all of the requirements. The "Choose my model" experience will appear on the Walmart.com PDP after the image has been processed successfully.

Have Questions About Workhorse?
Refer to this Studio Workhorse PDF on Supplier Academy.